Imagine controlling a robot with just a wave of your hand—no remotes, no screens. Sounds futuristic? Not anymore. With Raspberry Pi, a few sensors, and some Python code, you can create a gesture-controlled robot right in your classroom or makerspace.
This guide is part of our Top 10 Raspberry Pi Projects for STEM Students in 2025, and it’s one of the most fun and immersive Raspberry Pi robotics projects out there. If you’re into robotics STEM projects or want to seriously level up your coding and electronics skills, this one’s for you.
What Is a Gesture-Controlled Robot?
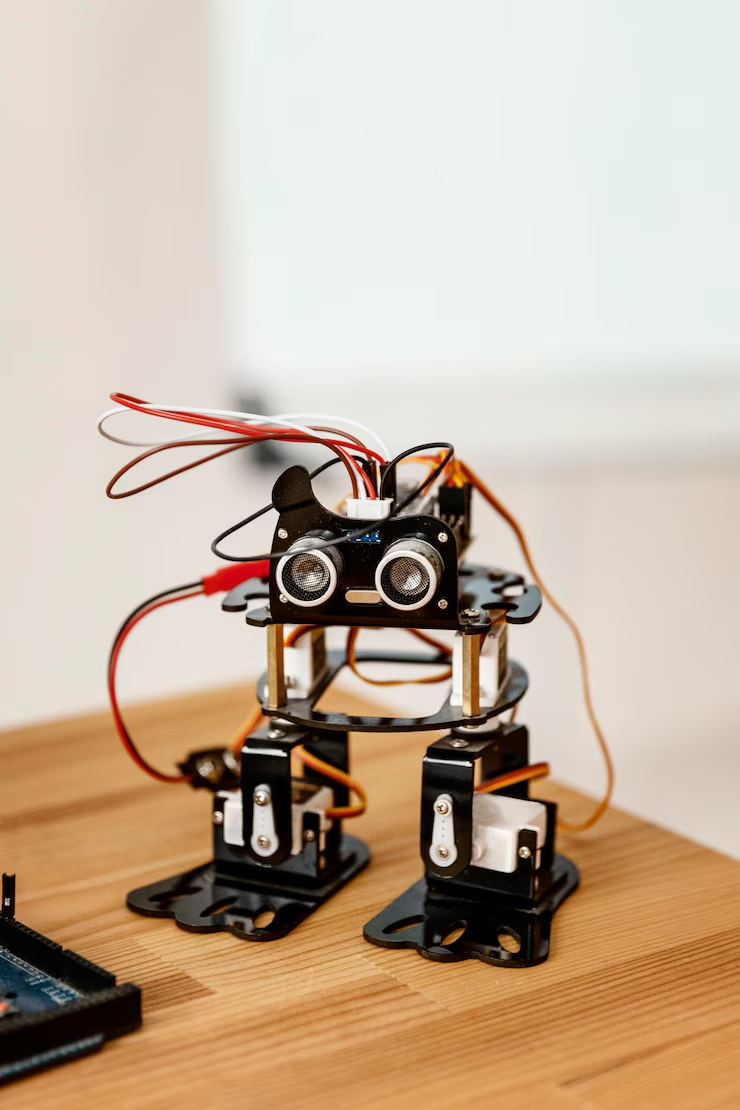
A gesture-controlled robot is exactly what it sounds like—a robot that moves based on how you tilt or move your hand. You wear a sensor (like an accelerometer) on your glove or hold it in your hand, and it sends data wirelessly to a Raspberry Pi robot that responds by moving forward, backward, left, or right.
This is a killer project for STEM education with Raspberry Pi, combining electronics, Python programming, robotics, and wireless communication all in one
.
What You’ll Need
- 2 x Raspberry Pi (one for controller, one for robot), or Pi + Arduino combo
- MPU6050 accelerometer/gyroscope sensor
- Motor Driver Module (like L298N)
- 2-wheel robot chassis (with DC motors)
- Jumper wires, breadboard
- Battery pack or power bank
- Python 3 (installed on Raspberry Pi)
- Optional: NRF24L01 modules for wireless communication or Bluetooth module
If you’re setting this up in a coding lab in schools or looking for educational Raspberry Pi projects, this setup is scalable across multiple students.
Wiring Guide
MPU6050 (Accelerometer)

On Controller Pi (or Arduino):
- VCC → 3.3V
- GND → GND
- SDA → GPIO2 (Pin 3)
- SCL → GPIO3 (Pin 5)
L298N Motor Driver
On Robot Pi:
- IN1/IN2/IN3/IN4 → GPIO pins (e.g., GPIO17, 18, 22, 23)
- ENA/ENB → Connected to 5V via jumper or PWM
- Motor A/B terminals → DC motors
- Power → 12V battery pack (DO NOT connect directly to Pi)

This project is a great step toward more advanced Raspberry Pi projects, ideal for high school or final-year students looking for Raspberry Pi project ideas.
Credit : Raspberrypi.stackexchan https://raspberrypi.stackexchange.com/questions/130816/will-my-l298n-circuit-work-and-will-it-be-safe
Programming with Raspberry Pi (Python Code)
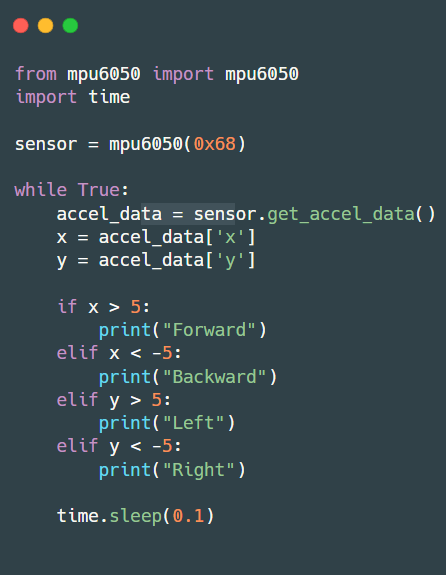
1. Reading Gestures from the MPU6050
Install necessary libraries:
bash
| sudo apt update sudo apt install python3-smbus pip3 install mpu6050-raspberrypi |
Example code to read orientation:
python
2. Robot Movement Code on Receiver Pi
python
You can link both Pis (or Arduino-Pi) using serial, Bluetooth, or NRF24L01 modules. This real-time communication teaches STEM students the basics of data transmission and control systems—perfect for Raspberry Pi-based STEM curriculum.
Learning Outcomes
- Use motion sensors to interpret human gestures
- Control motors and actuators using GPIO
- Wireless data transfer between boards
- Hands-on coding and debugging in Python
- Real-world robotics experience with Raspberry Pi
Budget-Friendly Tips

- Use Arduino Nano for the controller instead of a second Pi
- Buy sensor kits in bulk for affordable technology labs for schools from Cybotz technology
- Reuse chassis and wheels from old toys or printers
- Power robot with USB power banks instead of pricey LiPos
Expand Further
- Add Bluetooth voice control as a second input
- Use a camera to create an object-avoiding or tracking robot
- Let students develop their own gesture sets or commands
This isn’t just a DIY STEM education project—it’s a launching pad for future engineers.
Final Thoughts
The gesture-controlled robot is hands-down one of the best Raspberry Pi projects for student engagement in 2025. It’s modern, interactive, and delivers real value in both fun and learning.
If you’re building a Raspberry Pi classroom setup or searching for tech lab ideas for students, this project ticks every box.
Stay tuned for our next post: How to Build a Smart Security Camera with Raspberry Pi!