What You’ll Build
You’ll train your Raspberry Pi to recognize and respond to faces. Imagine walking into a room and your Pi-powered assistant greets you by name, or logs you into your own profile. You’ll use Python, OpenCV, and face recognition libraries to make it happen.
This is one of the most exciting Raspberry Pi robotics projects, perfect for students interested in AI, coding, and STEM learning.
What You’ll Need

- Raspberry Pi 4 (with Raspbian OS)
- Micro SD Card (16GB+)
- Monitor, Keyboard, and Mouse (for setup)
- Python libraries: OpenCV, face_recognition,Flask (optional)
- Internet connection
- Optional: Servo motor (for building a smart lock)
- Pi Camera Module or USB Webcam

Skills You’ll Learn
- Image processing and AI basics
- Machine learning model usage
- Real-time facial detection and recognition
- Python programming
- How to integrate AI in real-world devices
Hardware Wiring (Optional for Servo Unlock Feature)
If you’re adding a smart lock or servo:

- Connect Servo motor control to GPIO18 (Pin 12)
- Power (VCC) to 5V
- Ground (GND) to GND
Otherwise, this project is largely software-based.
Step-by-Step Software Setup
Step 1: Install Required Libraries – bash
| sudo apt update sudo apt install python3-pip pip3 install opencv-python face_recognition imutils flask |
Step 2: Capture and Train Faces- python
Use this script to capture your face and create encodings:
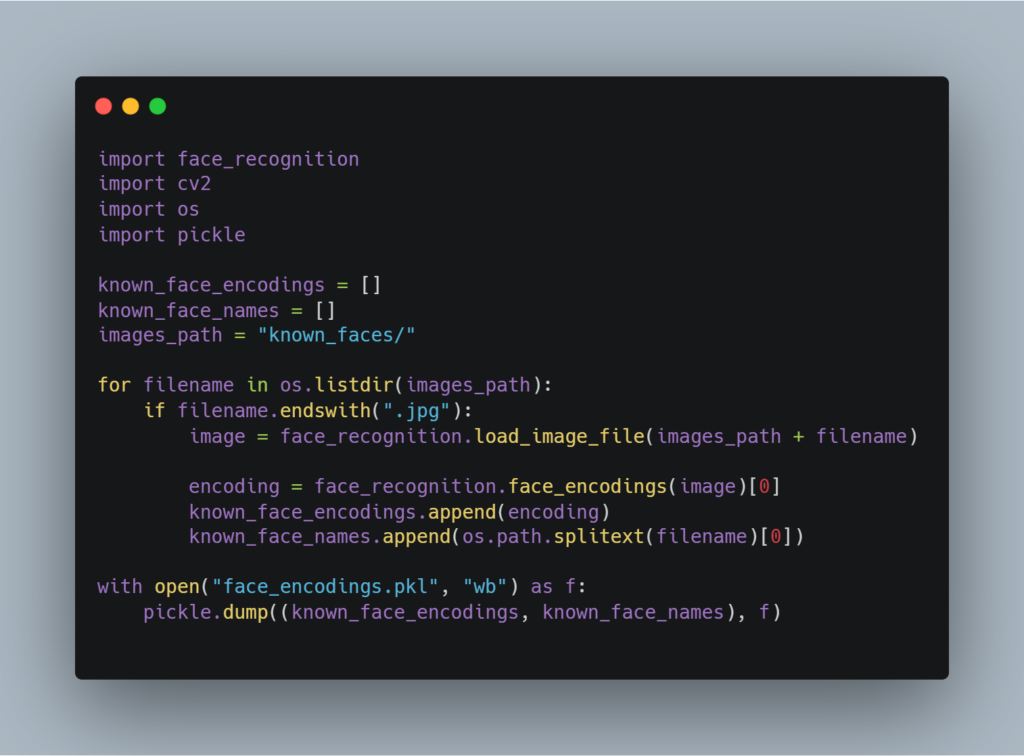
Save a few headshots of yourself or classmates in a folder called known_faces with filenames
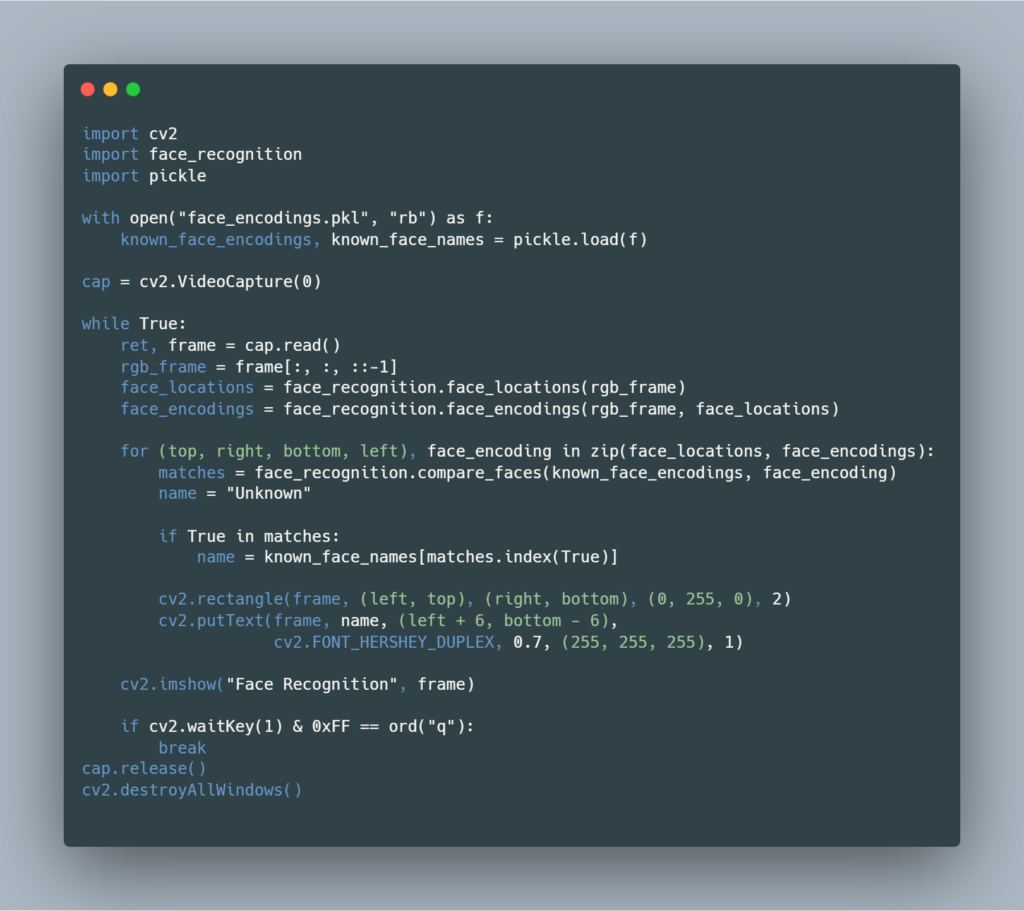
Step 3: Run Real-Time Recognition- python
Optional Add-On: Smart Lock or Voice Feedback
- Use a servo motor to open a door or drawer if your face is recognized.
- Add text-to-speech with pyttsx3 to make the system talk back.
Real-World Applications
- Smart home access control
- Office or lab attendance systems
- Personalized welcome kiosks
- Retail customer recognition
Learning Outcomes
- AI/ML model usage with Raspberry Pi
- Working with camera inputs and real-time video processing
- Creativity in combining hardware with software
Next Steps
- Train the model with more faces
- Create a web dashboard using Flask
- Send alerts or logs via email
- Add multi-language greetings or audio cues
Final Thoughts
This project shows just how far a $35 computer can go. Whether you’re building it as a personal challenge or part of a STEM lab for schools, this is one of the best Raspberry Pi projects for diving deep into AI and robotics.
It’s not just cool—it’s future-proof.
